How To Connect Letters In Cricut Design Space [Cursive Letters]
Whether you’re planning to design wedding invitations or a wooden sign, it is obvious to look for easy steps on how to connect letters in Cricut Design Space. I tried connecting cursive letters but failed! Luckily, here is a post for you. We will discuss simple tricks to connect letters (cursive) while using script fonts in the Cricut Design Space. You’ll also learn how to adjust the spacing between letters and weld the letters together correctly. Let’s proceed by opening the Design space to a new canvas first. And then, follow the step-by-step tutorial given below.
Cricut Design Space Update - May 2021
The new release: Cricut design space update has come with a font kerning process. The method of Kerning makes it easy and quick to work with Script fonts in the Cricut design space. You will find a lot of kerned fonts available in the Design Space, including Cricut fonts and system fonts. Please note you need not adjust the letter spacing manually; the process is entirely automatic.
Easy Steps to Connect Letters in Cricut Design Space
Here are the steps you can go through to make your script polished and professional.
First, utilize the Text tool and type a word on your canvas. Select the script font from the Font drop-down menu. Read below if the script letters aren’t connected to fix it immediately. Moreover, you can find new fonts on the creative market.
Adjusting The Letter Spacing
The first technique to connect is adjusting the letter spacing to connect cursive letters.
Now go to the top panel of the Cricut design space and find a letter spacing tool right next to the Font size.
In the next step, click the down arrow to reduce the letter spacing. It will move your letters closer together.
Make sure to experiment with letter spacing and find what suits your selected font choice best.
Use “Ungroup to Letters” to Adjust the Position of the Letter.
If your letter looks wrong or disconnected after adjusting, proceed using “Ungroup to Letters.” Here is how you can do this.
Select your text first.
Click on the Advanced drop-down menu and select Ungroup to Letters. (Advanced menu can be found on the top panel of Cricut Design Space, on the right-hand side).
Once you click on the “Ungroup to Letter,” you will find that each letter has its layer now.
To adjust the position of each letter, click & drag each letter by using the mouse cursor.
Make Use of Weld Tool to Connect the Letters
Once the positioning is done, use a welding tool to connect the letters. Weld letters together; otherwise, Cricut will cut the letter individually.
Select all the letters you want to cut. And then click the Weld button in the bottom-right corner of the Design space.
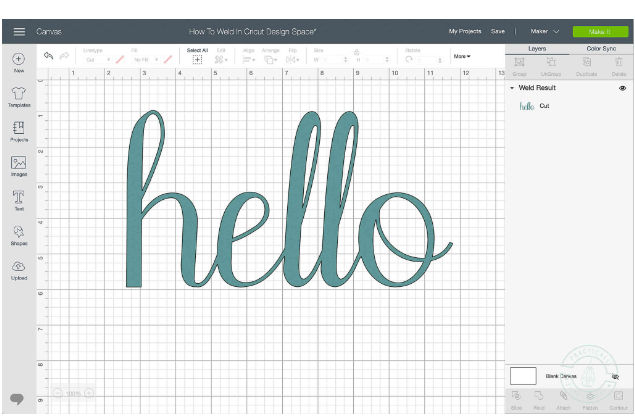
You will get to see that the thin black lines between each of the letters have disappeared. It indicates that all of the letters are merged. They are creating one single shape.
In Conclusion
We hope you have learned how to connect letters in Cricut Design Space. With all these steps, you can get started for commercial and professional purposes. Find below some commonly asked questions associated with the post above.
Frequently Asked Questions
Which is Better to Use Letter Spacing or Ungroup?
Both of these techniques are better in themselves. They are two tools you can find in your toolbox. One important thing to note is that both of these techniques can be utilized in the same project.
How Much Space is Required to Leave Between Letters?
While spacing, make sure to leave only short tails between the letters. Otherwise, you will need help getting your word off the mat. It may rip or tear your mat.
Why Are My Letters Not Welding on Cricut?
To make welding work, follow the steps given below.
Make the letters touch each other slightly.
Tap the left and suitable keyboards to move your letter.
Click and drag and move your notes.

Comments
Post a Comment